I use Ableton Live shortcuts to speed up my workflow when using what I believe to be the most fun and inspiring DAW. From navigating your sets more efficiently, to organizing your tracks, and for more creative applications, shortcuts can help you operate Live more intuitively and effectively. Here are some of the more basic shortcuts every Live user should know:
Navigate Between Session and Arrangement Views
Mac/PC: Tab
Switches between the Session and Arrangement views, offering different perspectives for composing and performing. At the heart of Live, these two unique views lend themselves to different methods of creativity.
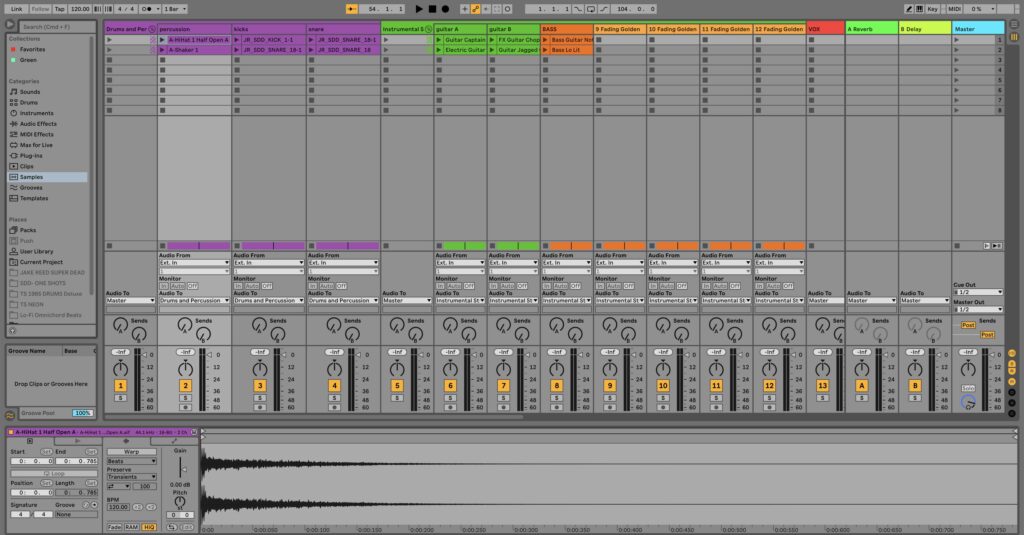
Session View is ideal for real-time triggering of loops, samples, and MIDI patterns, allowing you to experiment and create dynamic arrangements on the fly. It’s perfect for live performances and DJing.
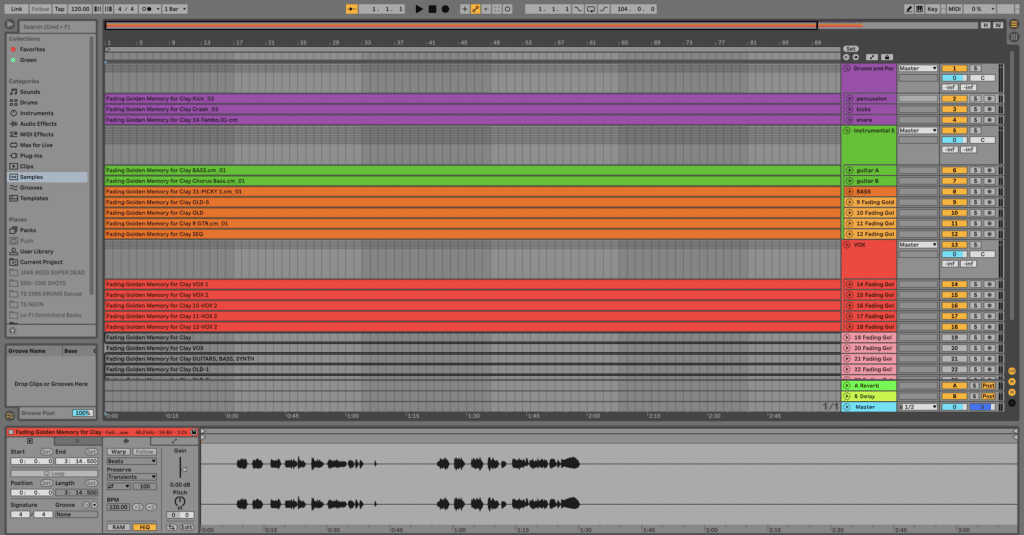
Arrangement View is better suited for traditional song composition, where you arrange and sequence clips along a linear timeline. It provides a comprehensive overview of your entire track, making it easier to structure and refine your music with precise control over arrangement details.
Use Tab to instantly shift between these two views.
The Arrangement View in Ableton Live
The Session View in Ableton Live
Start and Stop Playback with Spacebar
Mac/PC: Spacebar
Starts and stops playback, allowing you to audition your project without reaching for the transport controls. An essential Ableton Live shortcut that saves more time than any other, Spacebar eliminates the need for using the mouse for playback, making your workflow much more efficient.
Move Insert Marker to Beginning of Set
Mac: Home
PC: Home
Moves the insert marker to the very start of your project. This is essential for quickly returning to the beginning of your set, especially during arrangement or playback navigation.
Insert a new audio track
Mac: Cmd + T
PC: Ctrl + T
Creates a blank audio track to record or arrange audio clips in your project.
Insert a new MIDI track
Mac: Cmd + Shift + T
PC: Ctrl + Shift + T
Create a blank MIDI track for recording or programming MIDI notes.
Insert a new Return track
Mac: Cmd + Option + T
PC: Ctrl + Alt + T
Add a new Return track for routing effects like reverb or delay.
Group Tracks
Mac: Cmd + G
PC: Ctrl + G
Groups the selected tracks together, allowing you to control multiple tracks with one fader or parameter. This is particularly useful Ableton Live shortcut for managing related elements like drum kits, vocal harmonies, or layered instruments. As my sessions get larger, I will often place old/unused/unwanted tracks into a group called “OLD” which I then make smaller and nonactive.
Grouping tracks makes it easier to adjust levels, apply effects, and organize your project, especially when working with complex arrangements. It simplifies your workflow by consolidating similar tracks and reducing the need to adjust them individually.
Use Cmd or Ctrl + G to quickly group selected tracks and enhance your session’s organization.
Beneath are images from an Ableton Live Set for a song called “Take Care” by SIGNALS, which is currently being included in a mix contest sponsored by Polyverse. You can download the tracks and enter the contest for free. Winners get:
1st Place: All Polyverse Plugins (I Wish + Manipulator + Gatekeeper + Comet + Supermodal + Filterverse) – $694 value
2nd Place: Polyverse FX Bundle (Filterverse + Supermodal + Comet) – $397 value
3rd Place: Filterverse – $149 value
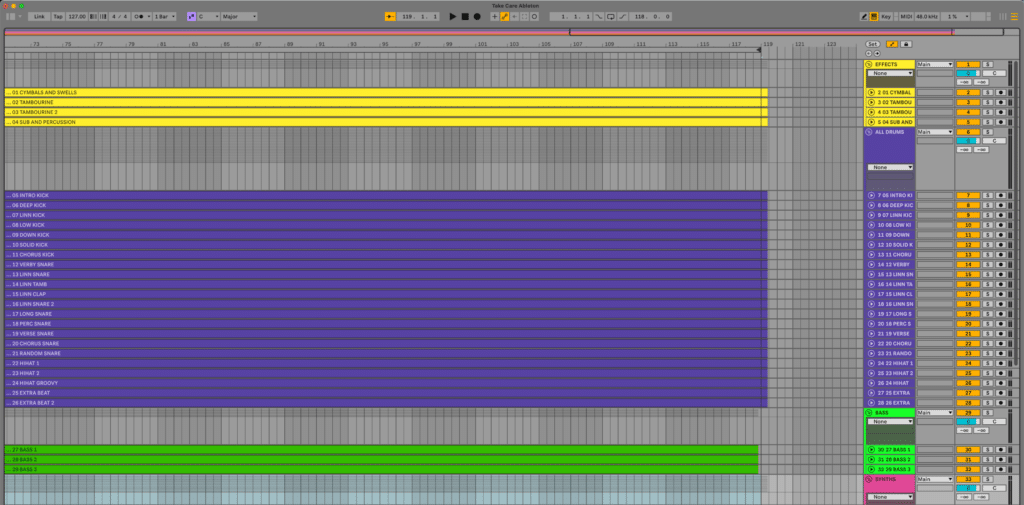
In this Live set I grouped the different categories of tracks which include effects, drums, bass, synths, etc. as to keep my set organized. You can also close or open the group folders as to make more visual real estate for other tracks.
The grouped tracks from the Ableton Live Set of Take Care.
The folded down groups from the Ableton Live Set of Take Care.
Several Vocal Tracks which have been placed into a ‘VOCAL GROUP’ Track. These can now be conveniently processed together.
Add a new Take Lane
Mac: Shift + Option + T
PC: Shift + Alt + T
Create a Take Lane to manage multiple takes for comping audio or MIDI recordings. Once all takes have been recorded, you can choose to have the best parts audible on the track by selecting them and hitting ENTER.
A compiled bass part, combined from 3 separate takes.
Show Take Lanes
Mac: Cmd + Option + U
PC: Ctrl + Alt + U
Toggles the visibility of Take Lanes in Arrangement View, allowing you to comp and organize multiple takes efficiently.
Duplicate the selected clip or scene
Mac: Cmd + D
PC: Ctrl + D
Duplicates the selected clip or scene, allowing you to quickly create copies for repetition or variation.
Copy the Selected Clip, Scene, or Automation
Mac: Cmd + C
PC: Ctrl + C
Copies the selected clip, scene, automation, or MIDI notes to your clipboard so you can paste it elsewhere within your project.
Paste the Selected Clip, Scene, or Automation
Mac: Cmd + V
PC: Ctrl + V
Pastes the copied content at the current location, allowing you to easily move or duplicate material within your session.
Rename the selected track, clip, group, or scene
Mac: Cmd + R
PC: Ctrl + R
Renames a selected item to help keep your project organized and easily navigable.
Split the selected clip at the cursor
Mac: Cmd + E
PC: Ctrl + E
Splits the selected clip at the current playhead position for precise editing or rearranging.
Quantize
Mac: Cmd + U
PC: Ctrl + U
Snaps selected notes or events to the grid based on the current quantization settings, helping to tighten up timing in your clips or arrangement. Honestly, I generally end up tweaking the quantize settings before applying quantization, so to show and hide this, the shortcuts are Mac: Cmd + Shift + U or PC: Ctrl + Shift + U
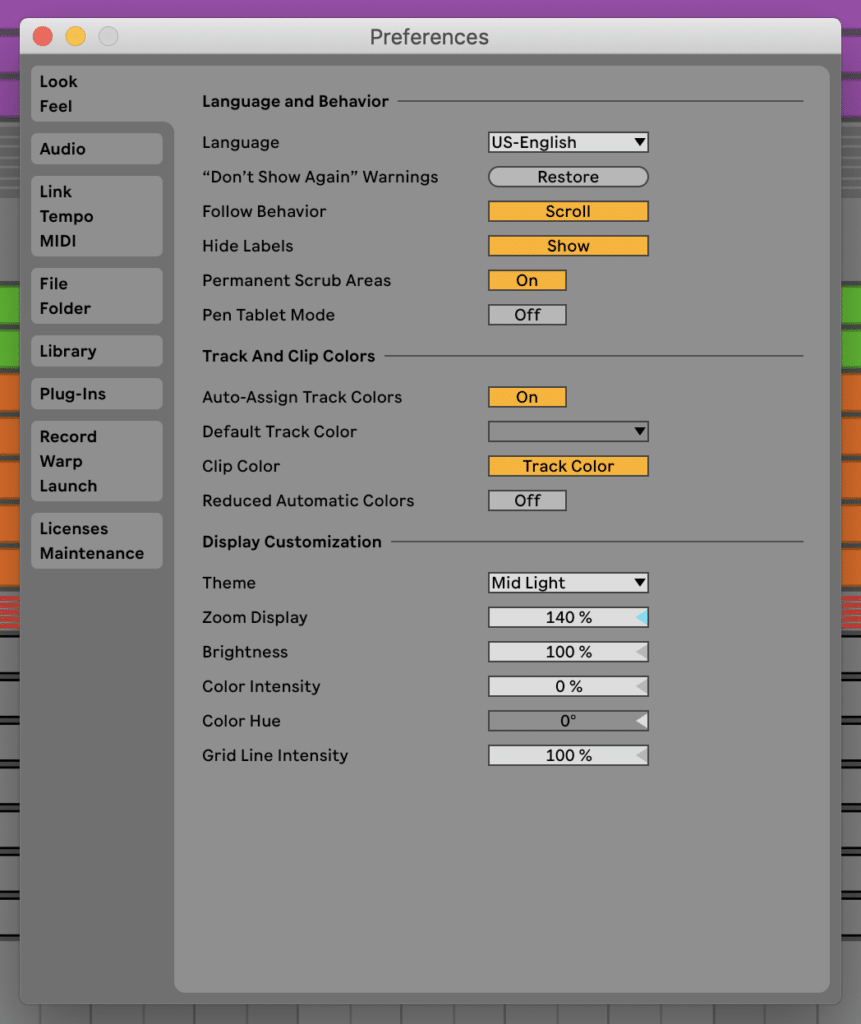
Open the Preferences window
Mac: Cmd + ,
PC: Ctrl + ,
Opens the Preferences window for adjusting settings that customize Ableton Live to your workflow.
The Live Preferences Window, which is helpful for altering the look, feel, and settings of your Live Set.
Consolidate selected clips into one
Mac: Cmd + J
PC: Ctrl + J
Merges multiple selected clips into a single cohesive clip for easier editing and arrangement.
Enable or disable MIDI Mapping mode
Mac: Cmd + M
PC: Ctrl + M
Activates or deactivates MIDI Mapping mode to assign MIDI controls to Ableton Live’s parameters for performance or automation. I love mapping parameters like reverb wet/dry or delay feedback to a fader or knob on my MIDI interface, which is an Arturia Keylab MKII. Simply enable MIDI mapping mode, click on the parameter you want to map, touch a knob or fader, and then you can control the parameter.
Zoom in/out vertically (track height)
Mac: Option + Scroll up/down
PC: Alt + Scroll up/down
This is one of several Ableton Live Shortcuts that can help you visually navigate your set. This adjusts the height of tracks in the arrangement or session view for better visibility and easier editing.
Zoom in/out horizontally (timeline zoom)
Mac: Command + Scroll up/down
PC: Ctrl + Scroll up/down
Allows you to zoom in and out of the timeline to focus on specific sections of your project.
Fit tracks to the screen vertically
Mac/PC: H
Automatically adjusts the track heights to fit within the available screen space.
Fit timeline to the screen horizontally
Mac/PC: W
Resizes the timeline so all the content fits within the screen, making navigation easier.
Save Live Set
Mac: Cmd + S
PC: Ctrl + S
One of the most essential Ableton Live Shortcuts, Save your current Live Set to prevent loss of work and keep your project up to date. Don’t forget the all important ‘Save As’ which is Mac: Cmd + Shift + S PC: Ctrl + Shift + S
We’ve all been there.
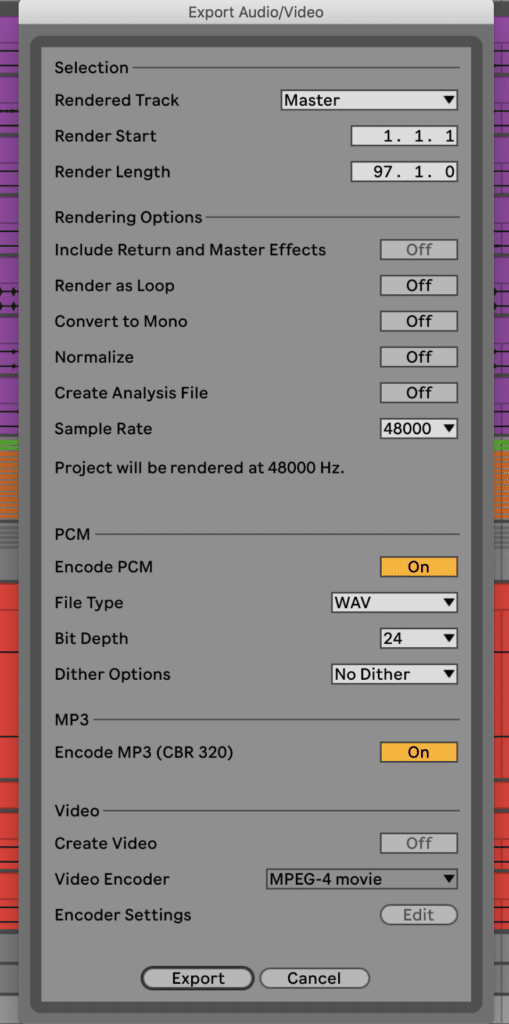
Export Audio/Video
Mac: Cmd + Shift + R
PC: Ctrl + Shift + R
Opens the Export Audio/Video dialog to render your project or selection to a file for sharing, mastering, or further production.
Ableton Live Shortcuts Summary
I hope this list has been helpful. Be mindful that it is by no means exhaustive, and there are plenty of other Ableton Live shortcuts you can utilize if you want to become and Ableton Live Power user. I have created a similar resource for Pro Tools, if that is your preferred DAW. Beneath is a quick guide if you’d like this information without the images and descriptions.
Ableton Live Shortcuts Quick Guide
Navigate Between Session and Arrangement Views
Mac/PC: Tab
Start and Stop Playback
Mac/PC: Spacebar
Move Insert Marker to Beginning of Set
Mac/PC: Home
Insert a new audio track
Mac: Cmd + T
PC: Ctrl + T
Insert a new MIDI track
Mac: Cmd + Shift + T
PC: Ctrl + Shift + T
Insert a new Return track
Mac: Cmd + Option + T
PC: Ctrl + Alt + T
Group Tracks
Mac: Cmd + G
PC: Ctrl + G
Add a new Take Lane
Mac: Shift + Option + T
PC: Shift + Alt + T
Show Take Lanes
Mac: Cmd + Option + U
PC: Ctrl + Alt + U
Duplicate the selected clip or scene
Mac: Cmd + D
PC: Ctrl + D
Copy the Selected Clip, Scene, or Automation
Mac: Cmd + C
PC: Ctrl + C
Paste the Selected Clip, Scene, or Automation
Mac: Cmd + V
PC: Ctrl + V
Rename the selected track, clip, group, or scene
Mac: Cmd + R
PC: Ctrl + R
Split the selected clip at the cursor
Mac: Cmd + E
PC: Ctrl + E
Quantize
Mac: Cmd + U
PC: Ctrl + U
Quantize Settings
Mac: Cmd + Shift + U
PC: Ctrl + Shift + U
Open the Preferences window
Mac: Cmd + ,
PC: Ctrl + ,
Consolidate selected clips into one
Mac: Cmd + J
PC: Ctrl + J
Enable or disable MIDI Mapping mode
Mac: Cmd + M
PC: Ctrl + M
Zoom in/out vertically (track height)
Mac: Option + Scroll up/down
PC: Alt + Scroll up/down
Zoom in/out horizontally (timeline zoom)
Mac: Command + Scroll up/down
PC: Ctrl + Scroll up/down
Fit tracks to the screen vertically
Mac/PC: H
Fit timeline to the screen horizontally
Mac/PC: W
Save Live Set
Mac: Cmd + S
PC: Ctrl + S
Save Live Set As
Mac: Cmd + Shift + S
PC: Ctrl + Shift + S
Export Audio/Video
Mac: Cmd + Shift + R
PC: Ctrl + Shift + R
About the Author
Ian Vargo is a Music Producer, Mix & Mastering Engineer, and Multi-Instrumentalist whose work has been heard on broadcast television, nationally televised ad campaigns, award-winning films, and viral web content amassing over 30 million views. His credits include projects for Disney | ABC, Intel, MSNBC, Airbnb, EA Games, and many more.
With over 20 years of experience in the studio, Ian has contributed to major label releases (Capitol, EMI, Fueled by Ramen, Universal, Interscope, Hollywood Records) as well as acclaimed independent projects. His passion lies in helping artists translate their creative vision into professional, release-ready recordings that stand out in today’s music landscape.
Interested in working together? Reach out at ianvargo@gmail.com if you need mixing or mastering for your next project.

