A Shepard tone is an auditory illusion that creates the perception of an infinitely rising or falling scale. It is named after cognitive scientist, Roger Shepard. It is sometimes referred to as a musical Barber pole, an analogous visual illusion. The first iteration of this idea was in the form of a scale built from octaves and moving in discrete steps known as the Shepard Scale. As the scale ascends, lower octaves fade in as higher octaves fade out. A classic example of its use is in the Mario Brothers video game.
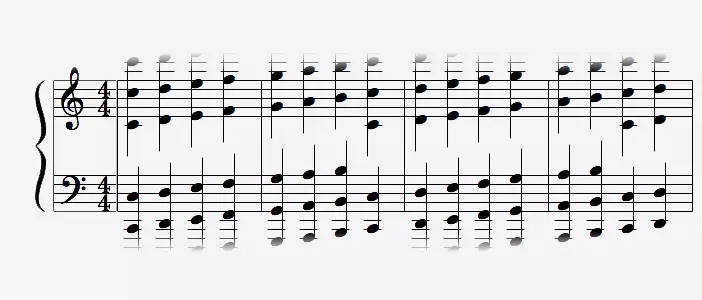
It could look something like this if notated (source):
Composer, Jean-Claude Risset, created a smoother version of Shepard’s discretely-stepped scale by introducing glissandi between the steps or gliding from one note to the next. This has become known as the Shepard-Risset glissando.
COMPOSERS AND ARTISTS THAT HAVE USED SHEPARD TONES
Many composers and musical artists have used this idea as a means to create an emotionally intense and unsettling aural experience. The effect is one of constant gradual movement toward a resolution that never occurs. A few notable examples include:
For Ann (rising) by James Tenney
Dunkirk – score for by Hans Zimmer
I am the Walrus by Lennon-McCartney (produced by George Martin)
Echoes by Pink Floyd
The Prestige – score by David Julyan
A Day at The Races by Queen
BUILDING A SHEPARD TONE IN YOUR DAW
There are many ways to create the Shepard Tone effect that range from simple to complex but the underlying principle remains the same. Pitches in octaves ascend (or descend) and at a certain point begin to fade out while lower octaves reappear and fade in. You could use several tracks to accomplish this and it is common to use four or more as seen in the Shepard Scale piano example above. But it is possible to get a reasonably good Shepard-Risset glissando effect with just two tracks and simple automation.
You start with a group of tones in octaves and raise the pitch over time along with the amplitude. When you reach an octave above the starting point you fade in a new set of tones the same as the first. Meanwhile, the first set fades away but the pitch continues rising.
The simplest way to achieve the pitch shift is using automated pitch bend data sent to a virtual instrument. The instrument must be capable of a 24-step change or two octaves. In some cases, you can set the pitch bend to +24 steps in the positive direction. In others, you may need to start the pitch bend at -12 and increase it to +12 depending on how the instrument is set up.
Zebra2 Pitch Bend settings under Global controls.
Sometimes it’s a bit of a treasure to hunt to find the pitch bend parameters in an instrument. They are often hidden under Global controls somewhere. Sample-based instruments are notorious for hiding pitch bend controls, giving you a limited range, or not allowing any control at all. I can only surmise that the reason for this is that the creators don’t want their painstakingly recorded, realistic samples to be pitch-shifted so dramatically because, in isolation, they would not sound realistic at all. But in the context of a Shepard-Risset glissando that is less of a problem.
That said, when using a source to apply the Shepard effect there are choices to consider. A sound that is overly modulated or has strange panning movement might not be the best option. Things can get quickly muddy or harsh with a lot of internal movement happening. Ideally, you want a lush pad that sounds smooth when sustained and handles extreme pitch-shifting without strange artifacts. Orchestral strings have been used a lot in this context, both acoustically and with sample-based instruments. Synth pads also work very well. You can use basic shapes like sine waves and sawtooth waves with reasonable success. Adding a bit of reverb goes far to smooth out a Shepard tone nicely.
But sustained sounds are not the only option and I encourage you to explore arpeggiated lines or looping melodic content as source material. The effect is not as vanilla as the standard Shepard scale of discrete rising tones. It can be both rhythmically and harmonically complex while retaining the emotional intensity of the sustained version. (hear examples below)
The nature of the automation and the way it unfolds is important for both pitch and amplitude parameters. Change can be linear, logarithmic, exponential or some hybrid form. You can adjust things manually as well to fit the context. There may be a “right” way to do it, but in a practical sense, if it sounds right, it is right. The goal should be the illusion of an infinite rising (or falling) tone. But if you come across something that undermines the illusion but sounds great, all the better! Serendipity is often the mother of discovery.
Let me take you through the steps to set up a simple Shepard-Risset glissando construct using Logic Pro. Any DAW will work because all of them have automation features and some sort of virtual instrument. Once you have the basic structure you can plug in a different instrument or alter the tempo to shorten or lengthen the effect as needed.
BUILDING SHEPARD TONES IN LOGIC PRO
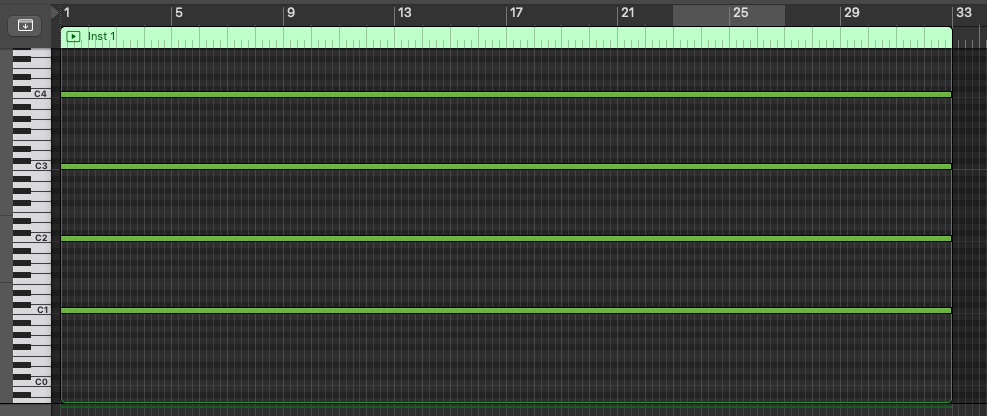
We’ll start with 4 sustained notes in octaves starting at C1 (2 octaves below middle C). This choice is somewhat arbitrary as we could start on any note. And there can be more or fewer octaves if you choose depending on the context and range of the instrument. We’ll use a 32-bar sustained sound for this example.
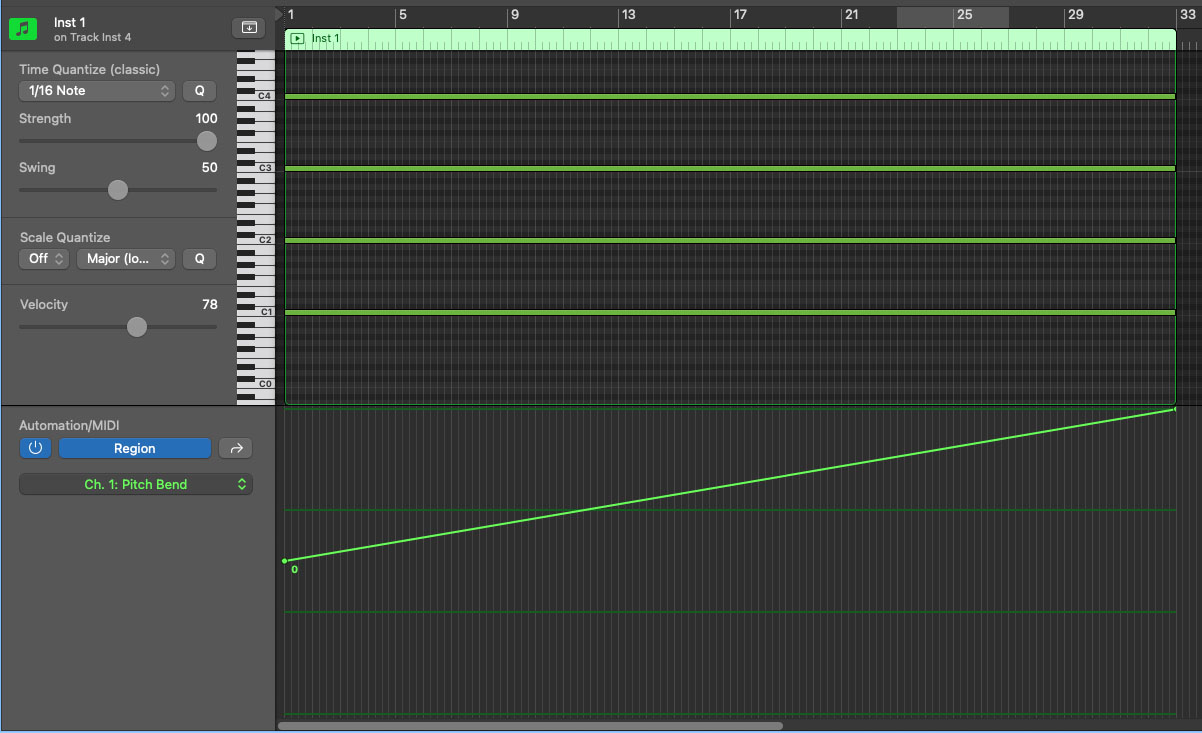
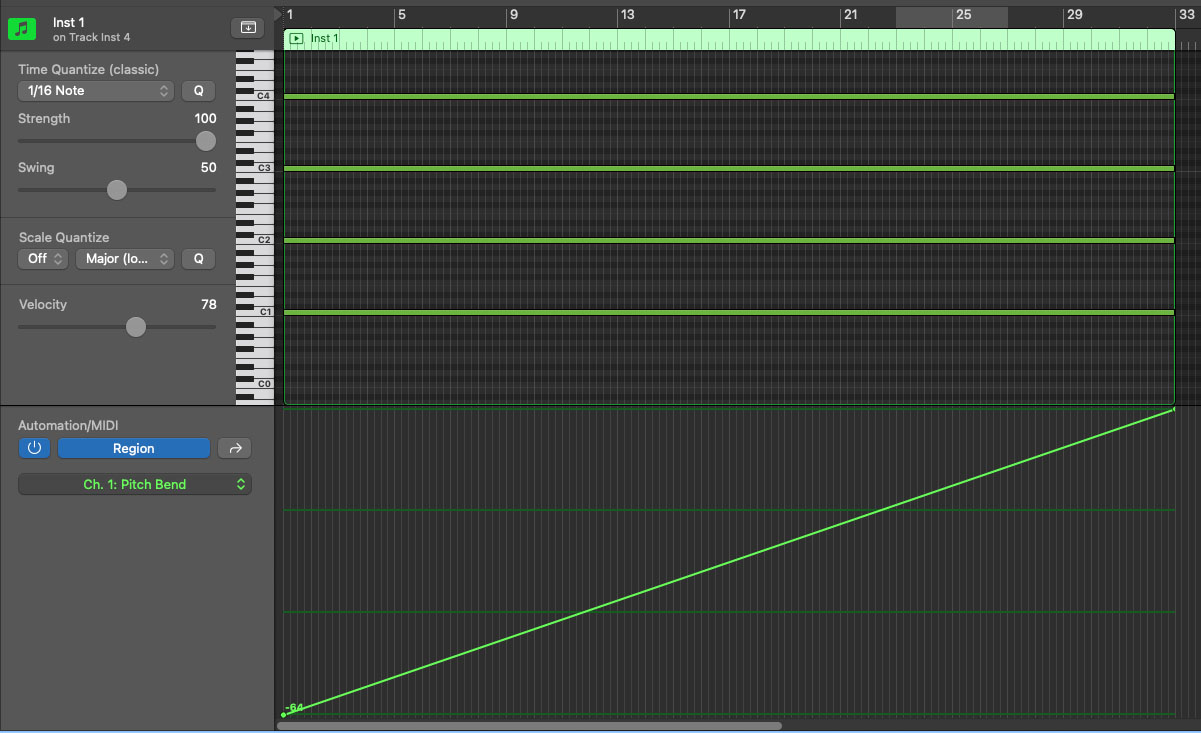
Next, we’ll add some automation for the pitch bend. Our choice here will depend on the instrument so you may have to adjust things a bit if you change instruments. If the instrument is capable of +24 steps in the positive direction you can start the pitch bend in the center and automate it upward just as you would a pitch wheel on a synth from the center to to the top. If the instrument is only capable of +12 in the positive direction, you’ll need to start at -12 and move to +12 to get the full 2-octave shift. We’ll use linear pitch bend automation as it seems to work best.
For instruments with +24 step pitch ben settings:
For instruments with -12 to +12 Pitch Bend settings:
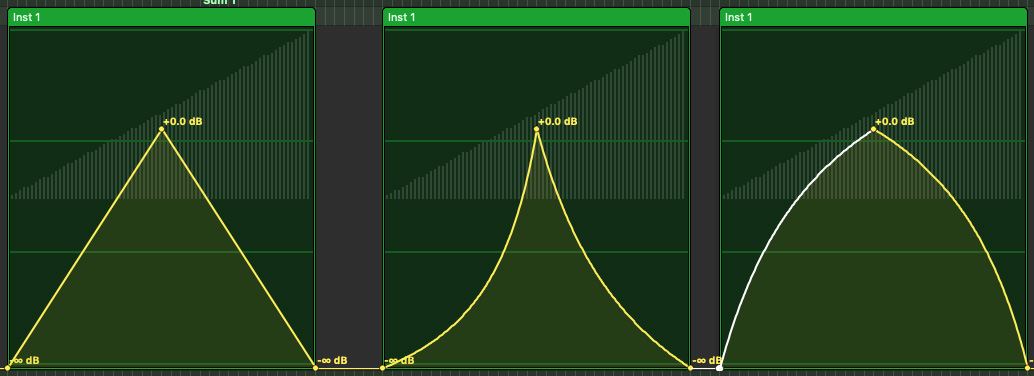
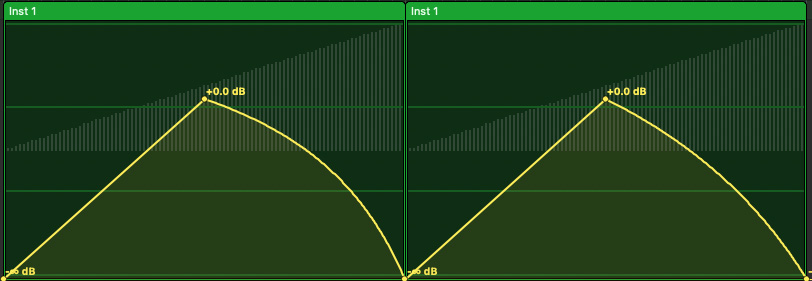
Now we can add the amplitude automation starting at the negative infinity setting and moving to 0dBFS halfway through the region. At bar 17 the amplitude begins fading out back to negative infinity by bar 32. The middle point is where the pitch has increased one octave from the start. As mentioned, I encourage you to experiment with the shape of the automation here. Logarithmic, exponential, and linear amplitude changes will all yield different results. While logarithmic fade-in might work well, fading out might require a different shape. Below are the three basic shapes to consider:
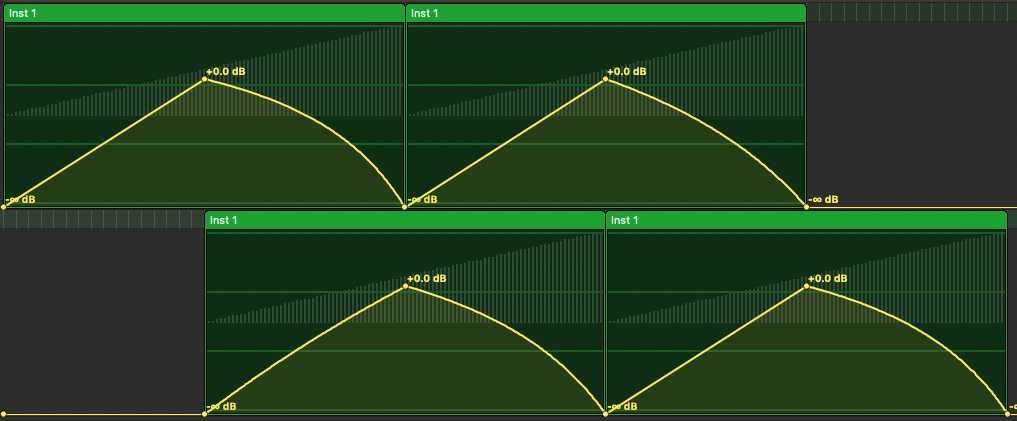
I chose to use a combination of ideas (see below). Once you have this basic construct, you can duplicate the region several times in a track depending on your needs. Be sure the amplitude automation gets copied with the region or alternatively, you can attach it directly to the region instead of the track.
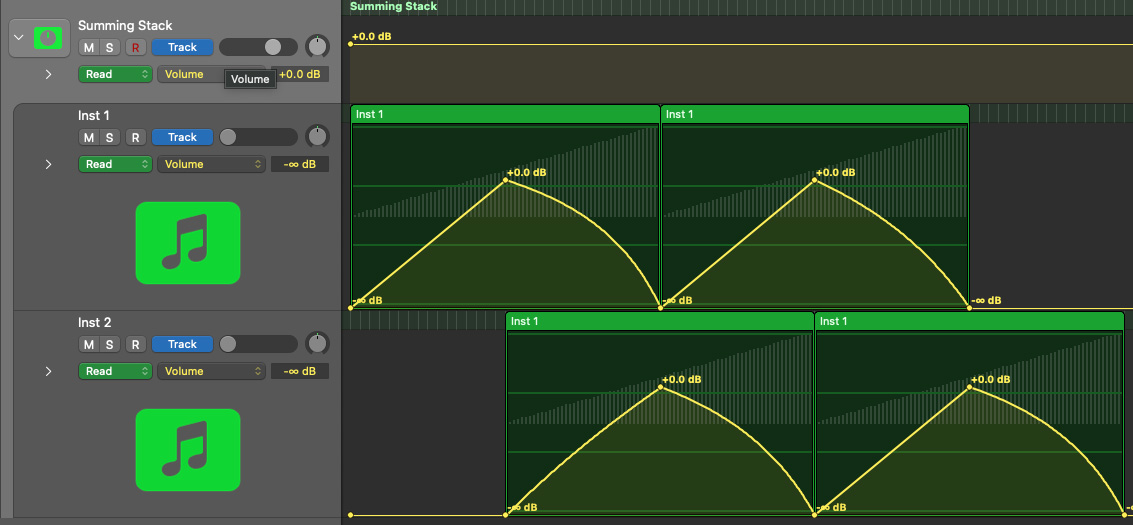
Now create a second track and copy the same region/automation there, only offset it by 16 bars. The second track should start playing halfway through the first region. Duplicate that region as needed.
Lastly, create a group or summing stack so that both tracks get bussed together and can be routed through the same effects chain to provide some audio “glue” for a cohesive result.
You’ll likely need some EQ to tame the resonant frequencies and adding a little verb on an AUX track is always a good idea.
Now that you have the basic structure it is a matter of finding the right sound or instrument to use. This is the fun part because you never know how a particular setting will react. Have fun and be patient until you get the perfect sound you’re after.
The only thing to be mindful of is the pitch bend setting. As mentioned, you need a 24-step range for this to work. Find the Global section on your synth and look for pitch bend settings. Typically, you can use a 24-step positive setting and you’re done. But you might need to start at -12 and go the +12 to get the full range. In that case, you’ll need to adjust the pitch automation to match the context.
CHANGING PITCH BEND SETTINGS IN KONTAKT TO BUILD SHEPARD TONES
I wanted to use orchestral samples for some of the examples below and some of the best libraries are often found in Kontakt, the sampling instrument from Native Instruments. As mentioned, acoustic-based instruments rarely give you the option for a 24-step pitch bend, so you’ll have to crack open the hood and tweak or add the pitch bend parameter.
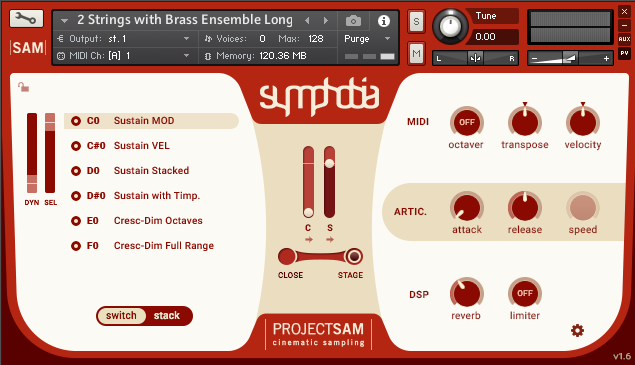
Here’s an example of how to do this with Symphobia by PROJECTSAM.
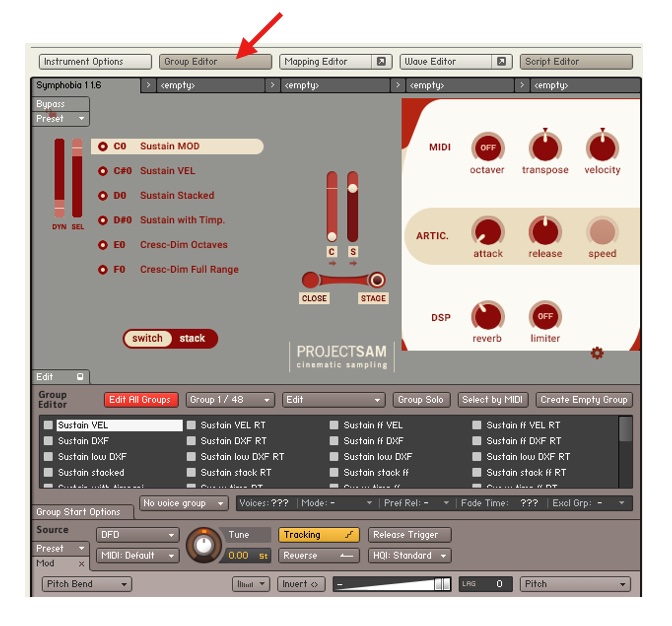
Click the wrench icon on the upper right to expose the guts of the instrument.
Click on the Group Editor button
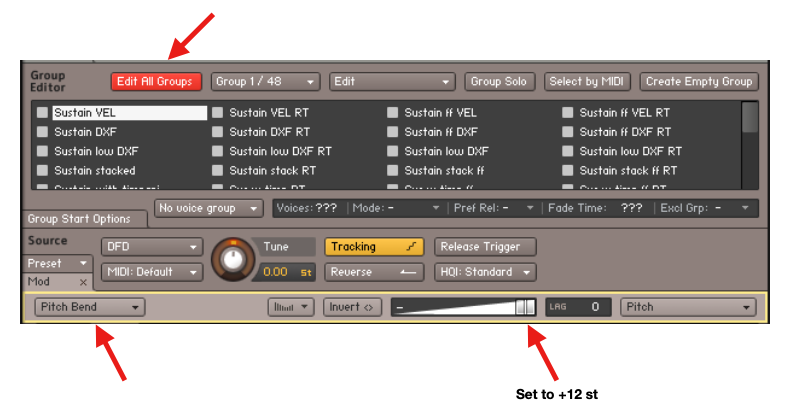
Click on Edit All Groups.
Go to the Mod Section and add a Pitch Bend control if one doesn’t exist.
Move the control slider all the way to the right to get the full 24-step range. This is a case where the automation will have to start at -12 and go to +12 for things to work.
Now copy the instrument with the same setting to the second track.
Hit the play button and enjoy the magic of the Shepard tone goodness!
Audio PlayerEXAMPLES
Below are a few examples using the structure created above with different virtual instruments:
Mysteria by Native Instruments
Audio PlayerString Ensemble from the Kontakt Factory Library (Native Instruments)
Audio PlayerDeft Lines from The Play Series (Native Instrument)
Audio PlayerOmnisphere String patch by Spectrasonics
Audio PlayerChamber Strings by Spitfire Audio
Audio PlayerZebra2 Cluster Pluck preset by u-he
Audio PlayerIris by iZotope
Audio PlayerArkhis by Orchestral Tools
Audio PlayerThorn by Dmitry Sches
Audio PlayerCustom Sampler – Hand Bells by Waveinformer
Audio PlayerCustom Sampler – Moog Minitaur by Waveinformer
Audio PlayerCustom Sampler – Fuzz Factory by Waveinformer
Audio PlayerCustom Sampler – Guitar Harmonics by Waveinformer
Audio PlayerNOTE: To download the full versions of all these Shepard-Risset glissandi and Custom IR files for FREE (48k/24bit wave files) – Subscribe to Waveinformer and go to the Member Resources page. Join as a Pro Member to get access to all content on the Member Resources page PLUS automatic eligibility for mixing and scoring contests.
VARIATIONS
There are as many ways to approach this idea as there are composers. You can achieve great results pitch-shifting audio files instead of virtual instruments. You can use LFOs or envelopes instead of track or region automation. Use whatever works for you based on your situation and skill set.
Of course, the Shepard tone can also be played in reverse as an infinitely descending sonic effect. Simply reverse the direction of the pitch bend leaving the amplitude automation untouched.
Here’s an example of a descending Shepard-Risset glissando using the Symphobia patch heard earlier:
Audio PlayerThe Risset Beat is equivalent to the barber pole effect for rhythm. As some musical content speeds up or slows down, additional content at the original tempo is cross-faded in, while the accelerating or decelerating part is faded out. Risset’s infinite acceleration is a rhythmic approach to the Shepard tone technique and has been used in EDM (source).
Here’s a good demonstration of the Risset Beat from Casey Connor:
CONCLUSIONS
There are many auditory illusions to talk about, but the Shepard Tone is one of the most fascinating to me. The infinite unresolved nature of this effect mirrors life in the contemporary world–relentless turmoil, wars, poverty, unresolved conflicts, injustice, and the daily struggle of survival in the world. That the simple rarefaction and compression of air molecules can somehow represent all that is a testament to the magic of sound.
EXTRAS
To download the full versions of all the Shepard-Risset glissandi and Custom IR files used in this article for FREE (48k/24bit wave files) – Subscribe to Waveinformer and go to the Member Resources page.
Assess your knowledge of essential audio production concepts using our online Quizzes.
Join as a Pro Member to get access to all content on the Member Resources page PLUS automatic eligibility for mixing and scoring contests.

